
40-MM GRENADE LAUNCHER, M79
This appendix provides guidance for US Army units to conduct training with the M79 grenade launcher. The weapon's characteristics, disassembly and assembly procedures, maintenance, sights, operation and function, marksmanship training, firing positions, indirect-fire role, and safety precautions are discussed.
A-1. DESCRIPTION
The M79 grenade launcher is a single-shot, break-open, breech-loading, shoulder-fired weapon (Figure A-1). It consists of a receiver group, fore-end assembly, barrel group, sight assembly, stock assembly, and sling. A rubber recoil pad is attached to the butt of the stock to absorb some of the recoil.

A-2. TECHNICAL DATA
Technical data for the M79 grenade launcher are as follows:
a. Weapon.
     Length
       Launcher (overall).............................73.70 cm (29 inches)
       Barrel group...................................38.10 cm (15 inches)
       Barrel only....................................35.60 cm (14 inches)


     Weight
       Unloaded.......................................2.72 kg (6.0 pounds)
       Loaded.........................................2.95 kg (6.5 pounds)
b. Ammunition.
     Caliber..........................................40 mm
     Weight...........................................227 grams (8 ounces)
c. Operational Characteristics.
     Action...........................................Break-open, single
                                                        shot


     Sights:
       Front..........................................Blade-type
       Rear...........................................Folding leaf-type,
                                                        adjustable


     Chamber pressure.................................17,685 kilopascals
                                                      (3,000 pounds psi)


     Muzzle velocity..................................76 mps (250 fps)


     Maximum range....................................400 meters (1,312 feet)


     Maximum effective range
       Area target....................................350 meters (1,148 feet)
       Point target...................................150 meters (492 feet)


     Minimum safe firing range:
       Training.......................................130 meters (426 feet)
       Combat.........................................31 meters (102 feet)
A-3. COMPONENTS
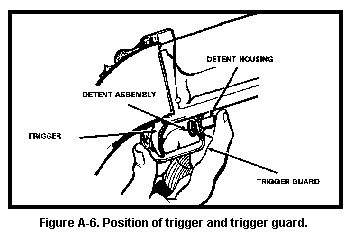
The major components of the 40-mm grenade launcher are shown in Figure A-2. The front and rear sights, the safety, the trigger and trigger guard detent assembly, and the barrel locking latch and lever are shown in Figure A-3 through Figure A-8.
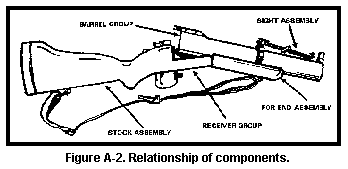
a. Rear Sight Assembly. Figure A-3 shows the adjustable rear sight assembly, which consists of a rear sight lock, a windage screw and windage scale, an elevation scale and lock screw, a sight carrier and retainer locknut, an elevating screw wheel and elevating screw, and a rear sight frame with fixed leaf sight. To align the rear sight with the front sight, adjust the ladder on the rear sight.
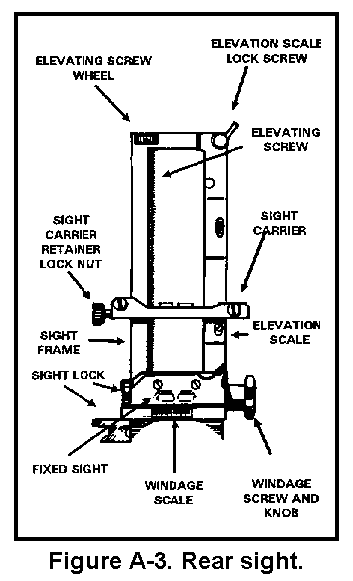
(2) Windage screw and windage scale. To adjust the rear sight for deflection, turn the knob on the right end of the windage screw. One click moves the impact of the grenade about 28 cm (11 inches) at a range of 200 meters. To adjust for right windage, turn the screw clockwise; for left windage, turn it counterclockwise. The windage scale has a zero line in its center and ten equally-spaced lines on each side of the zero line. You can move the rear sight assembly as much as 42 clicks right or left of center.
(3) Elevation scale and lock screw. The elevation scale is graduated from 75 to 375 meters in 25-meter increments and numbered at 100, 200, 300, and 375 meters. As you move the rear sight carrier up the adjustable elevation scale, the rear sight cams to the left to compensate for the normal right-hand drift of the projectile. The lock screw holds the elevation scale in position.
(4) Sight carrier retainer locknut. Position and clamp the carrier to the sight frame in the desired position on the elevation scale. Turn the retainer locknut counterclockwise until you can push it inward. The inward pressure unlocks the sight carrier, which allows you to move it along the elevation scale. To lock the sight carrier in position, release the pressure on the retainer locknut, and turn the nut clockwise until it stops.
(5) Elevating screw wheel and elevating screw. Use the elevating screw and screw wheel to make fine adjustments in elevation. Turn the wheel clockwise to increase the elevation setting, counterclockwise to decrease it. Turning the screw moves the sight carrier along the elevation scale. One complete turn (one click) moves the impact of the round about 2 1/2 meters at a range of 200 meters.
(6) Rear sight frame with fixed sight. When the rear sight frame is in the DOWN position, use the fixed sight to engage targets up to 100 meters away.
b. Front Sight. Figure A-4 shows the stationary front sight, which has a tapered blade and two blade guards.

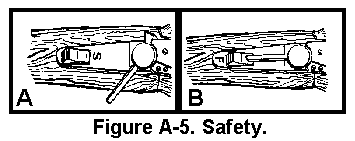
c. Safety. To fire the launcher, ensure the safety is positioned forward (A, Figure A-5), with the letter "F" visible near the rear of the safety. It will not fire if the letter "S" is visible. The safety automatically engages when you unlock the barrel locking latch and open the breech (B, Figure A-5).
d. Trigger and Trigger Guard Detent Assembly. Figure A-6 shows the locations of the trigger and trigger guard. Depress the detent assembly to move the trigger guard right or left. or to fire when wearing gloves or mittens.
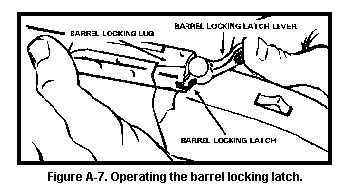
e. Barrel Locking Latch and Lever. Figure A-7 shows the barrel locking latch on top of the receiver. This latch locks the barrel to the receiver together. To open (break) the breech end of the barrel, press the latch lever all the way to the right.
A-4. AMMUNITION
The M79 grenade launcher uses standard M203 grenade launcher ammunition, which is issued IAW unit SOP.
A-5. CLEARING PROCEDURE
Clearing the weapon is always the first step in performing maintenance or handling.
a. Place the weapon on SAFE.
b. Rotate the barrel locking lever fully to the right.
c. Open the barrel.
d. Inspect the breech to ensure it is clear (no round is present).
e. Return the barrel to the firing position.
A-6. GENERAL DISASSEMBLY
The grenadier places each part he removes on a clean, flat surface, such as a table, shelter half, or disassembly mat, in the order they are removed. This helps in reassembly.
a. Remove the sling from the stock.
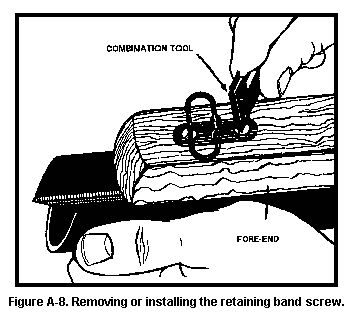
b. Remove the retaining band screw, which passes through the rear the front sling swivel mount, and pull the fore-end assembly away from the barrel (Figure A-8 and Figure A-9).

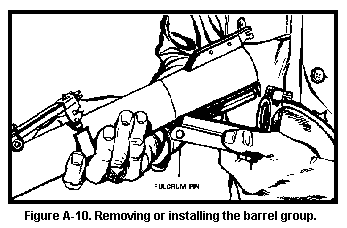
c. Press the barrel locking latch lever to the right, and pivot the barrel down until it stops; slide the barrel off the fulcrum pin, and remove it from the receiver (Figure A-10). Do not remove the rear sight from the barrel.
d. Remove the stock screw and washers, and pull the stock rearward from the receiver (Figure A-11).

A-7. CLEANING AND LUBRICATION
The grenadier cleans and lubricates the M79 grenade launcher the same as he would the M203 grenade launcher. (TM 9-1010-205-10 lists the tools and equipment required.)
A-8. GENERAL ASSEMBLY
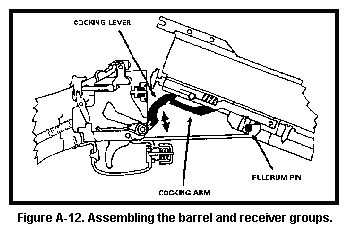
The grenadier should assemble the grenade launcher in the reverse order in which he disassembled it (Figure A-12).
a. Place the lock washer on the stock screw, and install the stock on the receiver.
b. Place the barrel on the fulcrum pin. Hold the cocking lever up, lower the barrel, and ensure that the cocking arm slides under the cocking lever. Close the barrel.
c. Place the fore-end assembly on the barrel, and secure it by replacing the retaining band screw.
d. Replace the sling.
A-9. CARE AND HANDLING
Proper maintenance of the M79 grenade launcher is vital and must be part of all gunnery training programs. Good maintenance contributes to weapon effectiveness as well as to unit readiness. Maintaining the weapon includes clearing, disassembling, cleaning, lubricating, and inspecting it, and checking its assembly and functions.
A-10. OPERATION AND FUNCTION
Operations include loading, unloading, and firing the weapon, which uses a high-low propulsion system to fire a round. The firing pin strikes the primer, whose flash ignites the propellant in the brass powder-charge cup inside the high-pressure chamber. The burning propellant produces 35,000 psi chamber pressure, which ruptures the brass powder-charge cup at the vent holes. This allows the gases to escape to the low-pressure chamber ill the cartridge case, where the pressure drops to 3,000 psi and propels the grenade from the muzzle at a velocity of 250 fps. The grenade's 37,000 rpm right-hand spin stabilizes the grenade during flight and applies enough rotational force to arm the fuze. The grenadier loads and unloads the weapon with the barrel open, and fires it from a closed bolt. The launcher must be cocked before it can be placed on SAFE.
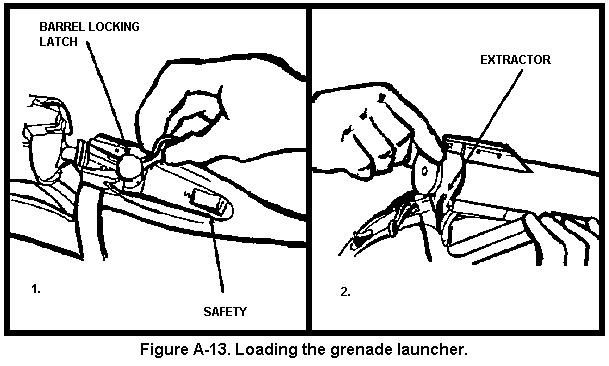
a. Loading. To load the weapon (Figure A-13)--
(2) Insert a round into the chamber, ensuring the extractor contacts the cartridge case rim.
(3) Close the weapon.
(4) Place the weapon on SAFE.
| WARNING |
|---|
KEEP THE MUZZLE POINTED DOWNRANGE AND CLEAR OF ALL SOLDIERS. USE THE CORRECT AMMUNITION; NEVER USE HIGH-VELOCITY 40-MM AMMUNITION. |
b. Unloading. To unload the weapon (Figure A-14)--
(2) If the cartridge case is partially extracted, remove the cartridge case. If the cartridge case is not partially extracted, engage the extractor tang and pull it rearward.
(3) Grasp the cartridge case and remove it.

| WARNING |
|---|
|
A-11. CYCLE OF FUNCTIONING
Grenadiers can recognize and correct a stoppage if they understand how the weapon functions. The loading and firing of a round and the resulting effect on the parts of the weapon are referred to as the cycle of functioning. Many of the actions in this cycle occur at the same time and are separated here only to explain them more clearly.
a. Unlocking. Before you can unlock the barrel from the receiver and move the safety to the SAFE position, you must press the barrel locking latch lever all the way to the right, so spring-loaded latch lock holds the barrel locking latch open (Figure A-15).

b. Cocking. Opening the barrel cocks the weapon by causing the cocking arm to lift the cocking lever. The cocking lever rotates around the hammer pin until it contacts a stud on the hammer. Then the lever rotates upward with the hammer until the sear engages the sear notch, cocking the weapon.
c. Extracting. This occurs while you are cocking the weapon (Figure A-16). As you open the barrel, the spring-loaded extractor withdraws the spent cartridge case about 1/2 inch from the breech end of the barrel.

d. Ejecting. The M79 grenade launcher does not eject rounds automatically; remove the expended cartridge case or live round from the barrel (Figure A-17).
e. Loading. With the barrel in the open position, insert the cartridge into the breech end of the barrel (Figure A-17).

f. Chambering. Closing the barrel forces the extractor into the extractor housing, which causes the cartridge to seat in the chamber.
g. Locking. Closing the barrel also depresses the latch lock, which rotates until it locks the barrel to the receiver (when it engages the barrel locking lug). To fire the weapon, push the safety forward to expose the letter "F."
h. Firing. As you pull the trigger rearward, it rotate s on the trigger pin. The rear of the trigger lifts the rear of the sear, causing the nose of the sear to disengage from the sear notch in the hammer. This release s the spring-driven hammer, which strikes the firing pin and drives it forward to strike the primer of the cartridge. When you release the trigger, the hammer settles back slightly, allowing the firing pin spring to withdraw the pin from the face of the retainer (Figure A-18.).

A-12. PERFORMANCE PROBLEMS AND DESTRUCTION
Performance problems and destruction procedures for the M79 grenade launcher are the same as for the M203 grenade launcher.
A-13. MARKSMANSHIP
Marksmanship training teaches the grenadier to fire the grenade launcher and prepares him to employ it in combat. Except for the subjects discussed in the remainder of this appendix, marksmanship training, range construction, and range firing are the same for the M79 grenade launcher as they are for the M203 grenade launcher.
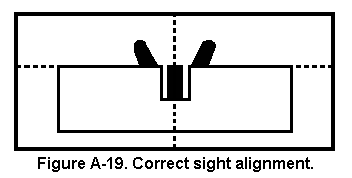
a. Sight Alignment, Sight Picture, and Sight Manipulation. Sight alignment is the relationship between the front sight blade and the rear sight notch. Figure A-19 shows the correct sight alignment. If you drew an imaginary horizontal line across the top of the rear sight notch, the top of the front sight blade would touch the line. If you drew an imaginary vertical line through the center of the notch, the line would cut the front sight blade in half. Sight picture includes sight alignment and the placement of the aiming point (Figure A-20). Sight manipulation means placing the rear sight carrier at the setting on the elevation scale that corresponds to the range to the target.
b. Positions. Firing positions for the M79 grenade launcher are the same as for the M203 grenade launcher. The ones you are most likely to use are the prone, kneeling, fighting, and standing positions. When you have an option, always use the more stable supported positions. Using the M79 in firing positions differs from using the M203 in the following ways:

(2) Several actions are common to all the firing positions for the M79 grenade launcher:
(b) Relax the fingers of your left hand, and place your hand so that the upper sling swivel cannot pinch it.
(c) Keep your left wrist straight, with your left thumb resting against the fore-end assembly--not on the rear sight base. If you place your thumb near the rear sight base, your thumb could be injured when you fire the weapon.
(d) Place your left elbow under the launcher.
(e) Position your right elbow far enough to the right to level your shoulders and far enough forward to form a good pocket for the butt of the launcher.
(f) Rest the thumb of your right hand along the side of the stock.
| WARNING |
|---|
| DO NOT PLACE YOUR THUMB OVER THE SMALL OF THE STOCK, AS THE SAFETY COULD INJURE YOUR THUMB WHEN THE LAUNCHER RECOILS. |
(h) Regardless of the firing position you have chosen, try to relax.
(3) At ranges less than 150 meters, you can fire normally from your shoulder in any position. However, to maintain sight alignment at greater ranges, lower the position of the stock on your shoulder or drop the butt from your shoulder. At near-maximum ranges, you must position the stock between your waist and your armpit and hold the stock firmly against your body with your upper arm. In the prone position, once the stock is no longer against your shoulder, rest the butt of the launcher on the ground. Be careful to keep your head level when your cheek breaks contact with the stock. Figure A-21 shows the changes that occur as the range to the target increases.


c. Zeroing Procedure. You have achieved a correct zero for a given range when your elevation and windage settings enable you to hit the point of aim. To zero the M79 grenade launcher, engage a target at 200 meters. This range allows you the most flexibility to adjust elevation.
(2) Unlock the elevation scale by turning its lock screw counterclockwise. Position the top of the scale flush with the top of the sight frame, and relock the scale. To unlock the rear sight carrier, turn and push the locknut that retains it. Slide the carrier along the elevation scale until the 200-meter index on the scale aligns with the top edge of the sight carrier. Relock the rear sight carrier.
(3) Assume a prone supported position, and align the target with the front and rear sights, using correct sighting and aiming procedure.
(4) Fire a round, sense the impact of the grenade, and adjust the sight.
(b) Windage. Turn the windage knob clockwise to move the impact of the grenade to the right, and vice versa. At a range of 200 meters, one click on the knob moves the impact of the grenade about 11 inches.
(5) Fire two more rounds, and adjust after each. If the last round landed within 5 meters of the target, the weapon is correctly zeroed.
(6) After confirming the zero, move the elevation scale so that the 200 meter index line is flush with the top of the sight carrier.
d. Indirect-Fire Role. Although the M79 grenade launcher is designed for direct fire, it can be used to place HE fragmentation fire on area targets that cannot be observed.
(2) Sighting system. The standard sight assembly is graduated up to 375 meters, which corresponds to a 32-degree elevation. However, you can raise the rear sight carrier to increase elevation to up to 40 degrees. The rear sight cannot be used at greater elevations. The most accurate way to fire the M79 grenade launcher in the indirect-fire mode is to attach an M15 rifle grenade sight to the weapon's stock (Figure A-23). This sight consists of a mounting scale plate and sight bar assembly.
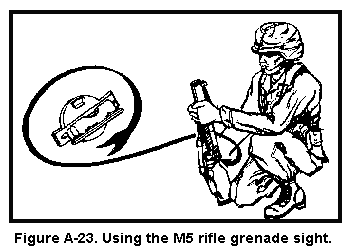
(b) Adjusting the M15 sight. Once you attach the M15 sight to the M79 grenade launcher, you will no longer need to use the mounting plate's degree scale. Place a short piece of masking tape on the stock above the mounting plate. Adjust your fires until the rounds impact at the desired range. After you determine the sight setting, draw a line on the tape along the top of the sight bar. Label each line for the appropriate range. Fire several rounds to determine the M15 sight elevation graduation required to fire the desired range. Mark this graduation on the stock for quick reference.
(c) Using the M15 sight. Align the launcher for deflection. Assume a correct firing position, sight over or along the barrel, and move the launcher to align the barrel toward the target. Ensure the weapon is not canted. Raise or lower the muzzle to center the leveling bubble and determine the angle of elevation. If you have enough light, using the M15 sight is the quickest, easiest way to determine the proper angle of elevation.
(3) Adjustments for elevation and deflection. To bring indirect-fire rounds nearer the target, move the barrel slightly for elevation or deflection.
Range
| Elevation
| Distance from front |
sling swivel to ground |
|---|---|---|
300 meters 400 meters |
58 degrees 41 degrees | 19 3/8 inches 12 1/4 inches |
(5) Fire control. You may fire indirectly only when you receive a specific command to do so.
          GRENADIER
          FRONT
          INDIRECT FIRE, 3 ROUNDS
          TROOPS IN OPEN
          AT MY COMMAND
(b) If the indirect-fire target is not visible from where you are, the squad leader may employ an observer.
(c) Grenade launcher fire-for-effect should always consist of three to five rounds, depending on the nature of the target.
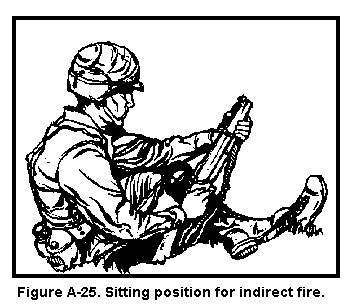
e. Firing Positions for Indirect Fire. You may fire the M79 grenade launcher indirectly from the kneeling, sitting, or squatting position.
(b) Sit on your right heel and place your left elbow outside your left knee.
(c) Place the butt of the stock on the ground against or alongside your right knee.
(d) With your left hand, grasp the launcher near the upper sling swivel. With your right, grasp the small of the stock. Your right thumb should be parallel to your trigger finger and against the right side of the stock. The weight of your body should rest on your right heel.

(b) Place the butt of the stock alongside your right hip.
(c) Hold the weapon as described for the indirect-fire kneeling position.

f. Methods of Indirect Fire. Three methods may be used to fire the M79 grenade launcher indirectly.
(2) Aiming stakes method. If you use aiming stakes, you can deliver planned indirect fire (Figure A-27). Place the aiming stakes, and verify their alignment in daylight. Record planned fires on a range card or sector sketch. Then place the fore-end assembly of the weapon on top of an elevation support, scooping a slight depression out of the ground for the toe of the weapon's stock. Adjust the weapon for the range desired, then drive a stake into the ground behind the toe of the stock to absorb recoil and prevent the weapon from digging into the ground. To control the barrel's lateral movement, place two deflection stakes behind the front elevation support. Place another elevation support beneath the stock of the weapon and two more deflection stakes behind the support to control the stock's lateral movement. Place the deflection stakes closer together than the two front stakes.

g. Safety Precautions. The grenadier should observe the following safety precautions in addition to those stated in AR 385-63 and in local range regulations:
(2) Ensure sufficient overhead clearance exists for indirect fire, and remember that some rounds arm themselves 14 to 28 meters from the muzzle of the launcher.
(3) Fire no rounds at less than 200 meters.