COMBAT TECHNIQUES OF FIRE
     The technique of fire is the method of delivering and controlling

     effective fire. The automatic rifleman must be trained in the standard

     methods of applying fire. This chapter discusses combat techniques of

     fire, application of fire on the battlefield, and advanced marksmanship.

     (See Appendix E for tactical employment.)
Before the automatic rifle can be employed to its full potential, the soldier must know and be trained on characteristics of fire, classes of fire, types of targets, and application of fire.
b. Maximum Ordinate. This is the highest point the trajectory reaches between the muzzle of the weapon and the base of the target. It always occurs about two-thirds of the distance from the weapon to the target. The maximum ordinate increases as the range increases (Figure 6-1).
Figure 6-1. Trajectory and maximum ordinate.
d. Beaten Zone. The beaten zone (Figure 6-2) is the elliptical pattern formed by the rounds striking the ground or the target. The size and shape of the beaten zone changes when the range to the target changes or when the weapon is fired on different types of terrain. On uniformly sloping or level terrain, the beaten zone is long and narrow. As the range to the target increases, the beaten zone becomes shorter and wider. When fire is delivered on terrain sloping down and away from the weapon, the beaten zone becomes longer. When fire is delivered on rising terrain, the beaten zone becomes shorter. The terrain has little effect on the width of the beaten zone.
Figure 6-2. Cone of fire and beaten zone.
(2) Plunging fire. This occurs when the danger space is confined to the beaten zone. Plunging fire occurs when firing at long ranges, from high ground to low ground, into abruptly rising ground, or across uneven terrain, resulting in a loss of grazing fire at any point along the trajectory.
Figure 6-3. Classes of fire with respect to the ground.
(2) Flanking Fire. This is firing at the side of a target (Figure 6-4).
(3) Oblique fire. This is when the long axis of the beaten zone is at an angle other than a right angle to the front of the target (Figure 6-5).
(4) Enfilade fire. This is when the long axis of the beaten zone coincides or nearly coincides with the long axis of the target. This type of fire is either frontal or flanking. It is the most desirable type of fire with respect to a target, because it makes maximum use of the beaten zone (Figure 6-5).
Figure 6-4. Frontal fire and flanking fire.
Figure 6-5. Oblique fire and enfilade fire.
(2) Traversing fire. This is fire distributed in width by successive changes in direction. The automatic rifleman selects successive aiming points throughout the width of the target. These aiming points must be close enough to ensure adequate coverage but not so close to waste ammunition.
(3) Searching fire. This is fire distributed in depth by successive changes in elevation. The automatic rifleman selects successive aiming points in depth. The changes in each aiming point depends on the range and slope of the ground.
(4) Traversing and searching fire. This is fire distributed in width and depth by successive changes in direction and elevation. Combining traversing and searching fires provides good coverage of the target. Adjustments are made in the same manner as described for traversing and searching fire.
Figure 6-6. Classes of fire with respect to the weapon.
Application of fire consists of the methods the automatic rifleman uses to cover a target area. Training these methods of applying fire can be accomplished only after the soldiers have learned how to recognize the different types of targets they may find in combat, how to distribute and concentrate their fire, and how to maintain the proper rate of fire. Normally, the automatic rifleman will be exposed to two types of targets in the squad sector: enemy soldiers and supporting automatic weapons. These targets have priority and should be engaged immediately.
b. Area Targets. These may have considerable width and depth and may require extensive traversing and searching fire. These include targets in which the exact location of the enemy is unknown. The following are varieties of area targets likely to be engaged.
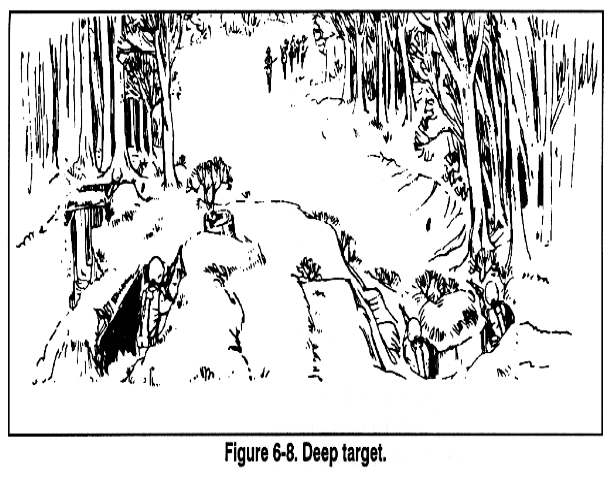
(2) Deep targets require successive aiming points (searching fire) (Figure 6-8). Searching fire is delivered at deep targets.
(3) Linear targets with depth have sufficient width requiring successive aiming points in which the beaten zone does not cover the depth of the target area. A combined change in direction and elevation (traversing and searching) is necessary to effectively cover the target with fire (Figure 6-9). Traversing and searching fire is delivered at linear targets with depth.
Figure 6-7. Linear target.
Figure 6-8. Deep target.
Figure 6-9. Linear targets with depth.
b. Concentrated fire is delivered at a point target such as an automatic weapon or an enemy fighting position.
c. The rates of fire that can be used with the M249 AR are sustained, rapid, and cyclic. These rates enable leaders to control and sustain fire and prevent the destruction of barrels. More than anything else, the size of the target and ammunition supply dictate the selection of the rate of fire.
(2) Rapid fire for the M249 automatic rifleman is 200 rounds per minute in bursts of 3 rounds. This provides for an exceptionally high volume of fire--but for only a short period.
(3) Cyclic fire uses the most ammunition that can be used in one minute. The cyclic rate of fire with the M249 AR is achieved when the trigger is held to the rear and ammunition is fed into the weapon uninterrupted for one minute. Normal cyclic rate of fire is 850 rounds.
Figure 6-10. Engagement of point target.
Figure 6-11. Engagement of area target.
Figure 6-12. Engagement of hard-to-identify targets with a reference point within the target area.
Figure 6-13. Engagement of hard-to-identify targets with a reference point within the target area.
(5) Linear target with depth. When engaging a linear target with depth, the automatic rifleman uses traversing and searching fire. He begins engagement at the midpoint of the target unless another portion of the target is more critical or presents a greater threat. He traverses and searches to the near flank, then back to the far flank. When engaging hard-to-identify linear targets with depth, he designates the flanks and midpoint with rifle fire. The reference-point method is not used because at least two reference points are required to show the angle of the target.
b. Pair of Automatic Riflemen.
Figure 6-14. Engagement of area targets with a pair of automatic riflemen.
Figure 6-15. Engagement of linear targets with a pair of automatic riflemen.
(b) If one part of the target is a greater threat, fire can be concentrated on the greater threat by dividing the target unevenly. This special division of the target is done with fire commands. To preclude confusion, the automatic riflemen initially aim on the midpoint regardless of the special division to be made.
Figure 6-16. Engagement of deep targets with a pair of automatic riflemen.
Figure 6-17. Engagement of linear target with depth with a pair of automatic riflemen.
b. Tracer ammunition helps an automatic rifleman engage targets during limited visibility and should be used, if possible. If firing unaided, automatic riflemen must be trained to fire low at first and adjust upward. This overcomes the tendency to fire high.
c. When two or more automatic riflemen are engaging linear targets, linear targets with depth, or deep targets, they do not engage these targets as they would when visibility is good. With limited visibility, the center and flanks of these targets may not be clearly defined; therefore, each automatic rifleman observes his tracers and covers what he believes to be the entire target.
Predetermined fires organize the battlefield for the automatic riflemen. They allow the leader and automatic riflemen to select potential targets or target areas that will most likely be engaged or that have tactical significance. This includes dismounted enemy avenues of approach, likely positions for automatic weapons, and probable enemy assault positions. The automatic riflemen do this by using sectors of fire, final protective lines, or a principal direction of fire and selected target areas. This preparation maximizes the effectiveness of the automatic rifle during good as well as limited visibility. It enhances fire control by reducing the time required to identify targets, determine range, and manipulate the weapon on to the target. Abbreviated fire commands and previously recorded data enable the automatic rifleman to aim or adjust fire on the target quickly and accurately. Selected targets should be fired on in daylight whenever practical to confirm data. The range card identifies the targets and provides a record of firing data.
b. Final Protective Fire. An FPF is an immediately available prearranged barrier of fire to stop enemy movement across defensive lines or areas.
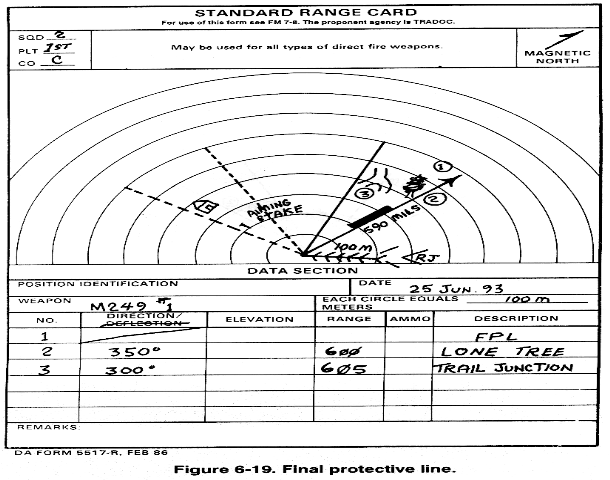
c. Final Protective Line. An FPL is a predetermined line along which grazing fire is placed to stop an enemy assault. If an FPL is assigned, the M249 is sighted along it except when other targets are being engaged. An FPL becomes the M249's part of the unit's final protective fires. An FPL is fixed in direction and elevation; however, a small shift for search must be employed to prevent the enemy from crawling under the FPL and to compensate for irregularities in the terrain or the sinking of the bipod legs into soft soil during firing. Fire must be delivered during all conditions of visibility.
d. Principal Direction of Fire. A PDF is a direction of fire assigned priority to cover an area that has good fields of fire or has a likely dismounted avenue of approach. It also provides mutual support to an adjacent unit. Weapons are sighted using the PDF if an FPL has not been assigned. If a PDF is assigned and other targets are not being engaged, weapons remain on the PDF. A PDF has the following characteristics.
(2) When the target has width, direction is determined by aiming on one edge of the target area and noting the amount of traverse necessary to cover the entire target.
(3) The automatic rifleman is responsible for the entire wedge-shaped area from the muzzle of the weapon to the target, but elevation may be fixed for a priority portion of the target.
e. Grazing Fire. A good FPL covers the maximum area with grazing fire. Grazing fire can be obtained over various types of terrain out to a maximum of 600 meters. To obtain the maximum extent of grazing fire over level or uniformly sloping terrain, the automatic rifleman sets the rear sight at 600 meters. He then selects a point on the ground that he estimates to be 600 meters from the weapon, and he aims, fires, and adjusts on that point. To prevent enemy soldiers from crawling under grazing fire, he searches (downward) by lowering the muzzle of the weapon. To do this, the automatic rifleman separates his elbows.
f. Dead Space. The extent of grazing fire and the extent of dead space may be determined in two ways. In the preferred method, the weapon is adjusted for elevation and direction. A member of the squad then walks along the FPL while the automatic rifleman aims through the sights. In places where the soldier's waist (midsection) falls below the automatic rifleman's point of aim, dead space exists. Arm-and-hand signals must be used to control the soldier who is walking and to obtain an accurate account of the dead space and its location. Another method is to observe the flight of tracer ammunition from a position behind and to the flank of the weapon.
g. Fire Control. Predetermined targets, including the FPL or PDF, are engaged on order or by SOP. The signal for calling for these fires is normally stated in the defense order. Fires on predetermined targets may be controlled by arm-and-hand signals, voice commands, or pyrotechnic devices. Automatic riflemen fire the FPL or PDF at the sustained rate of fire unless the situation calls for a higher rate. When engaging other predetermined targets, the sustained rate of fire is also used unless a different rate is ordered.
h. Primary Sector of Fire. The primary sector of fire is the area to be covered by an individual or unit.
i. Secondary Sector of Fire. The secondary sector of fire is the same area covered by the same individual or unit after it has moved to a different location.
Figure 6-18. Automatic weapon symbol.
(2) If an FPL is not assigned, the left and right limits are set with stakes in the same manner. Then, the weapon is adjusted to aim along the PDF. Markers or stakes are placed immediately to the left and right of the feet of the bipod legs. When firing along the PDF, the automatic rifleman aligns the bipod feet with the markers.
(3) To determine the range for all targets in the sector, the automatic rifleman ensures each circle, except the first one, represents 100 meters. Since the lowest setting on the M249 AR is 300 meters, the first circle represents 300 meters. He indicates this on the range card in the data section just below the circles. On the top half of the range card, the automatic rifleman draws the left or right limits from the weapon position to the maximum effective range of the M249 AR.
(4) If an FPL is assigned, the automatic weapon symbol is drawn along that line (left or right limit) (Figure 6-19).
(5) The extent of grazing fire is determined. A shaded blade is sketched on the inside of the FPL to represent the extent of the grazing fire.
(6) If there is dead space along the FPL, it is shown by breaks in the shaded area.
(7) The ranges to the near and far edges of the dead space are recorded above the FPL, and the extent of the grazing fire is recorded along the FPL.
(8) The magnetic azimuth of the FPL is determined and recorded below the shaded blade representing the FPL.
(9) If a PDF is assigned, the automatic weapon symbol is sketched in the center of the left and right limits pointing in the direction of the PDF (Figure 6-20).
(10) Next, the left and right limits of the secondary sector are drawn using a broken line. The area between the primary and secondary sector is labeled dead space.
(11) An arrow is drawn in the magnetic north block (upper right hand corner) pointing in the direction of magnetic north.
(12) The position is oriented with a prominent terrain feature (recognizable on a map) by obtaining a magnetic azimuth to or from the terrain feature to the position.
(13) A line is drawn between these two points. Arrow barbs are drawn along this line pointing in the direction the magnetic azimuth was taken. The magnetic azimuth is recorded in degrees below the line.
(14) If a prominent terrain feature is not available, the position is identified by using an eight-digit grid coordinate. The grid coordinate is recorded below the position on the range card.
(15) The automatic rifleman's number, unit designation (sqd, plt, CO), and date are recorded in the upper left hand corner. For security, a unit designation higher than a company is not used.
(16) Targets within the sector are identified. A symbol is drawn to represent the target in the appropriate place within the sector of fire. Targets in the primary sector are shown by numbers enclosed in circles. An FPL, when assigned, is always labeled target number 1. Other targets are assigned subsequent numbers in order of tactical importance.
(17) The ranges to the targets are determined and recorded below each target sketch.
(18) For targets in the secondary sector, the target is sketched on the range card, the range determined, and recorded below the sketch.
(19) The target number, direction, range, and description are recorded in the data section for targets in the primary sector but not for the secondary sector.
(20) For targets in both the primary and secondary sector, the field expedients used to engage targets are drawn above the sketch of the target.
Figure 6-19. Final protective line.
Figure 6-20. Principal direction of fire.
Figure 6-21. Notched-stake or tree-crotch technique of engaging predetermined targets.
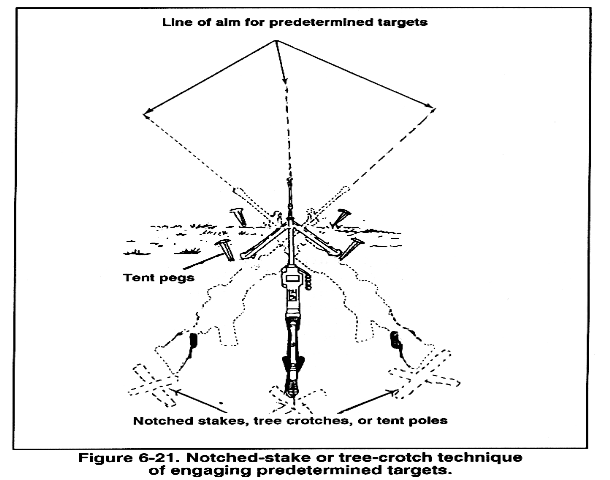
(3) To better control the weapon within his sector, he drives tent pegs in the ground in front and behind the feet of the bipod legs where he can rotate the weapon from left to right or vice versa (Figure 6-21).
Fire control includes all actions of the leader and soldiers in planning, preparing, and applying fire on a target. The leader selects and designates targets. He also designates the midpoint and flanks or ends of a target, unless they are obvious to the automatic rifleman. It is the automatic rifleman's responsibility to open fire at the instant desired, and then to adjust fire, regulate the rate of fire, shift from one target to another, and cease fire. When firing, the automatic rifleman should continue to fire until the target is neutralized or until signaled to do otherwise by the leader.
b. Arm-and-Hand Signals. This is an effective method when the automatic rifleman can see the leader. All automatic riflemen must know the standard arm-and-hand signals. The leader gets the automatic rifleman's attention and then points to the target. When the automatic rifleman returns the READY signal, the leader commands FIRE.
c. Prearranged Signals. These are either visual or sound signals such as casualty-producing devices, pyrotechnics, whistle blasts, or tracers. These signals should be included in SOPs. If the leader wants to shift fire at a certain time, he gives a prearranged signal such as smoke or pyrotechnics. Upon seeing the signal, the automatic rifleman shifts his fire to a prearranged point.
d. Personal Contact. In many situations, the leader must issue orders directly to individual soldiers. This method is used more than any other by small-unit leaders. The leader must use maximum cover and concealment to keep from disclosing the position or himself.
e. Standing Operating Procedures. SOPs are actions to be executed without command that are developed during the training of the squads. Their use eliminates many commands and simplifies the leader's fire control. SOPs for certain actions and commands can be developed to make automatic riflemen more effective. Some examples follow.
(2) Fire. Automatic riflemen open fire without command on appropriate targets that appear within their sectors.
(3) Check. While firing, the automatic riflemen periodically check with the leader for instructions.
(4) Return Fire. The automatic riflemen return enemy fire without order, concentrating on enemy automatic weapons.
(5) Shift Fire. Automatic riflemen shift their fires without command when more dangerous targets appear.
(6) Rate of Fire. When automatic riflemen engage a target, they initially fire at the rate necessary to gain and maintain fire superiority.
(7) Mutual Support. When two or more automatic riflemen are engaging the same target and one stops firing, the other increases the rate of fire and covers the entire target. When only one automatic rifleman is required to engage a target and the leader has alerted two or more, the automatic rifleman not firing aims on the target and follows the movements of the target so that he can fire instantly should the other M249 AR malfunction or cease fire before the target has been eliminated.
f. Range Cards. When using this method of fire control, the leader must ensure all range cards are current and accurate. Once this is done, the leader may designate certain targets for certain weapons with the use of limiting stakes or with fire commands. He should also designate no-fire zones or restricted fire areas to others. The key factor in this method of fire control is that automatic riflemen must be well disciplined and pay attention to detail.
b. Elements. Fire commands for all direct-fire weapons follow a pattern that includes similar elements. There are six elements in the fire command for the M249 AR: alert, direction, description, range, method of fire, and command to open fire. The automatic riflemen repeat each element of fire command as it is given.
(2) Direction. This element indicates the general direction to the target and may be given in one or a combination of the following methods.
(b) Pointing. The leader designates a small or obscure target by pointing with his finger or aiming with a weapon. When he points with his finger, a soldier standing behind him should be able to look over his shoulder and sight along his arm and index finger to locate the target. When aiming his weapon at a target, a soldier looking through the sights should be able to see the target.
(c) Tracer ammunition. Tracer ammunition is a quick and sure method of designating a target that is not clearly visible. When using this method, the leader should first give the general direction in order to direct the automatic rifleman's attention to the target area. To prevent the loss of surprise when using tracer ammunition, the leader does not fire until he has given all elements of the fire command except the command to fire. The leader may fire his individual weapon or fire one or more bursts from a machine gun. The firing of the tracer(s) then becomes the last element of the fire command and is the signal to open fire.
     Example:

     AUTOMATIC RIFLEMAN

     FRONT

     FIVE HUNDRED

     WATCH MY TRACER(S)
(d) Reference points. Another way to designate obscure targets is to use easy-to-recognize reference points. All leaders and automatic riflemen must know terrain features and the terminology used to describe them (FM 21-26). When using a reference point, the word "reference" precedes its description. This is done to avoid confusion. The general direction to the reference point should be given.
     Example:

     AUTOMATIC RIFLEMAN

     FRONT

     REFERENCE: BUNKER, CENTER MASS

     TARGET: TROOPS EXTENDING SHORT ONE HUNDRED,

     OVER

     ONE HUNDRED

     FOUR HUNDRED

     FIRE


     (Sometimes the reference point may be outside the target area).

     Example:

     AUTOMATIC RIFLEMAN

     FRONT

     REFERENCE: BUNKER, RIGHT FOUR FINGERS, CENTER

     MASS

     TARGET: TROOPS EXTENDING SHORT ONE HUNDRED,

     OVER

     ONE HUNDRED

     THREE HUNDRED

     SEARCH

     AT MY COMMAND

     FIRE


    (Sometimes a target must be designated by using successive reference

points).

     Example:

     AUTOMATIC RIFLEMAN, ALPHA TEAM

     RIGHT FRONT

     REFERENCE: RED-ROOFED HOUSE, LEFT TO HAYSTACK,

     LEFT

     TO BARN


     (Finger measurements can be used to direct the automatic rifleman's

attention to the right or left of reference points).

     Example:

     AUTOMATIC RIFLEMAN

     LEFT FRONT

     REFERENCE: CROSSROADS, RIGHT FOUR FINGERS
(3) Description. The target description creates a picture of the target in the minds of the automatic riflemen. To properly apply their fire, the soldiers must know the type of target they are to engage. The leader should describe it briefly. If the target is obvious, no description is necessary.
(4) Range. The leader always announces the estimated range to the target. The range is given so the automatic rifleman knows how far to look for the target and what range setting to put on the rear sight. Range is announced in meters; however, since the meter is the standard unit of range measurement, the word "meters" is not used. With M249 ARs, the range is determined and announced to the nearest hundred or thousand (in other words, THREE HUNDRED, or ONE THOUSAND).
     Example:

     AUTOMATIC RIFLEMAN

     FRONT

     REFERENCE: KNOCKED-OUT TANK, LEFT TWO FINGERS

     TARGET: TROOPS

     THREE HUNDRED
(5) Method office. This element includes manipulation and rate of fire. Manipulation is used to prescribe the class of fire with respect to the weapon. It is announced as FIXED, TRAVERSE, SEARCH, or TRAVERSE AND SEARCH. Rate is used to control the volume of fire (sustained, rapid, and cyclic). Normally, the automatic rifleman uses the sustained rate of fire. The rate of fire is omitted from the fire command. The method of fire for the M249 in the AR mode is a three-round burst. For area targets beyond 400 meters, a five- to seven-round burst may be needed to create an effective beaten zone.
     Example:

     AUTOMATIC RIFLEMAN

     FRONT

     REFERENCE: KNOCKED-OUT TANK, LEFT TWO FINGERS

     TARGET: TROOPS

     THREE HUNDRED

     TRAVERSE
(6) Command to open fire. It is recommended that fire be withheld so that surprise fire can be delivered on a target or to ensure that both automatic riflemen open fire at the same time. The leader may preface the command to commence firing with AT MY COMMAND or AT MY SIGNAL. When the automatic riflemen are ready to engage the target, they report READY to the leader. The leader then gives the command FIRE at the specific time desired.
     Example:

     AUTOMATIC RIFLEMAN

     FRONT

     TROOPS

     FOUR HUNDRED

     AT MY COMMAND or AT MY SIGNAL (Pause until automatic

     riflemen are ready and fire is desired.)

     FIRE (on prearranged signal)


     If immediate fire is required, the command FIRE is given without pause

and the automatic riflemen fire as soon as they are ready.
c. Subsequent Fire Commands. These fire commands are used to make adjustments in direction and elevation, to change rates of fire after a fire mission is in progress, to interrupt fires, or to terminate the alert. If the automatic rifleman fails to properly engage a target, the leader must promptly correct him by announcing or signaling the desired changes. When these changes are given, the automatic rifleman makes the corrections and resumes firing without further command.
(2) Changes in the rate of fire are given orally or by arm-and-hand signals.
(3) To interrupt firing, the leader announces "Cease fire," or he signals to cease fire. The automatic riflemen remain on the alert. They resume firing when given the command FIRE.
(4) To terminate the alert, the leader announces "Cease fire, end of mission."
d. Doubtful Elements and Corrections. When the automatic rifleman is in doubt about any element of the fire command, he replies "Say again range, target." The leader then announces "The command was," repeats the element in question, and continues with the fire command.
     Example:

     AUTOMATIC RIFLEMAN

     FRONT

     TROOPS

     SIX HUNDRED

     CORRECTION

     THREE HUNDRED

     TRAVERSE

     AT MY COMMAND
(2) When the leader makes an error in the subsequent fire command, he may correct it by announcing "Correction," and then repeating the entire subsequent fire command.
     Example:

     LEFT FIVE METERS, DROP ONE METER

     CORRECTION

     LEFT FIVE METERS, DROP ONE HUNDRED METERS
e. Abbreviated Fire Commands. Fire commands need not be complete to be effective. In combat, the leader gives only the elements necessary to place fire on a target quickly and without confusion. During training, however, he should use all of the elements to get automatic riflemen in the habit of thinking and reacting properly when a target is to be engaged. After the automatic rifleman's initial training in fire commands, he should be taught to react to abbreviated fire commands, using one of the following methods.
     Example:

     AUTOMATIC RIFLEMAN, ALPHA TEAM

     MACHINE GUN

     FOUR HUNDRED

     FIRE
(2) Arm-and-hand signals. Battlefield noise and the distance between the automatic rifleman and the leader often make it necessary to use arm-and-hand signals to control fire (Figure 6-22). When an action or movement is to be executed by only one of the automatic riflemen, a preliminary signal is given to that automatic rifleman only. The following are commonly used signals for fire control.
(b) Commence firing or change rate of firing. The leader brings his hand (palm down) to the front of his body about waist level, and moves it horizontally in front of his body. To signal an increase in the rate of fire, he increases the speed of the hand movement; to signal slower fire, he decreases the speed of the hand movement.
(c) Change direction or elevation. The leader extends his arm and hand in the new direction and indicates the amount of change necessary by the number of fingers extended. The fingers must be spread so the automatic rifleman can easily see the number of fingers extended. Each finger indicates 1 meter of change for the weapon. If the desired change is more than 5 meters, the leader extends his hand the number of times necessary to indicate the total amount of change. For example, RIGHT NINE would be indicated by extending the hand once with five fingers showing and a second time with four fingers showing for a total of nine fingers.
(d) Interrupt or cease firing. The leader raises his arm and hand (palm outward) in front of his forehead and brings it downward sharply.
(e) Other signals. The leader can devise other signals to control his weapons. A detailed description of arm-and-hand signals is given in FM 21-60.
Figure 6-22. Arm-and-hand signals.
During combat, ranges are seldom known. Poor visibility and damp ground often make adjustment of fire by observation difficult if not impossible. Therefore, correct range determination is extremely important for accurate effective fire. Range estimation and lateral distance measurement are two methods used to determine the range to the target.
Table 6-1. Factors of range estimation.
(b) To use the appearance-of-objects method with any degree of accuracy, the automatic rifleman must know the characteristic details of objects as they appear at various ranges. For example, the automatic rifleman should study the appearance of a man standing at a range of 100 meters. He fixes the man's appearance firmly in his mind, carefully noting details of size and the characteristics of uniform and equipment. Next, he studies the same man in a kneeling position and then in a prone position. By comparing the appearance of the man at known ranges from 100 to 500 meters, the automatic rifleman can establish a series of mental images that will help determine range on unfamiliar terrain. Training should also be conducted in the appearance of other familiar objects such as weapons or vehicles. Because the successful use of this method depends upon visibility, anything that limits visibility (such as weather, smoke, or darkness) will also limit the effectiveness of this method.
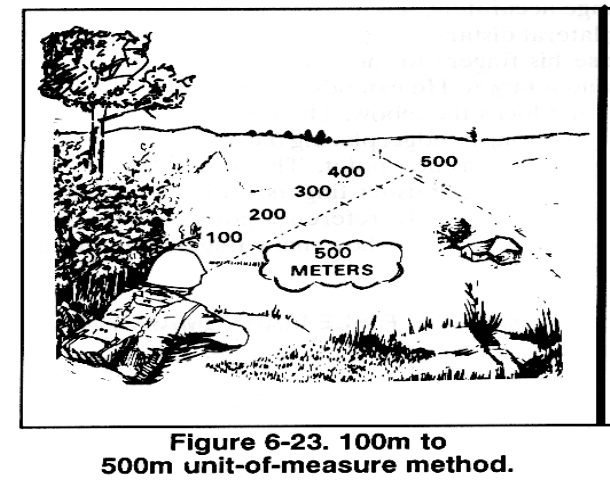
(2) 100-meter-unit-of-measure method. To use this method, the automatic rifleman visualizes a distance of 100 meters on the ground. For ranges up to 500 meters (Figure 6-23), he determines the number of 100-meter increments between the two points he wishes to measure. Beyond 500 meters (Figure 6-24), he selects a point halfway to the target, determines the number of 100-meter increments to the halfway point, and then doubles it to find the range to the target.
(b) Proficiency in the 100-meter-unit-of-measure method requires constant practice. When training in this technique, the automatic rifleman should make frequent comparisons between the range as determined by the himself and by pacing or other accurate means of measurement. The best training technique is to pace the range after he has visually determined it. In this way, he discovers the actual range for himself, which makes a much greater impression than if he is told the correct range.
Figure 6-23. 100m to 500m unit-of-measure method.
Figure 6-24. 100m to 800m unit-of-measure method.
(3) Combination of methods. Under ideal conditions, either the appearance-of-objects method or 100-meter-unit-of-measure method is an effective method of estimating range. However, ideal conditions rarely exist on the battlefield, so the automatic rifleman must use a combination of methods. The terrain might limit the use of the appearance-of-objects method. For example, an automatic rifleman may not be able to see all the terrain out to the target; however, he may see enough to get a general idea of the distance. A slight haze may obscure many of the target details, but the automatic rifleman should still be able to judge its size. By carefully considering the ranges estimated by both methods, an experienced automatic rifleman should arrive at a figure close to the true range. The best way to reduce errors using these two methods is to train often.
Once the automatic rifleman masters the four fundamentals of automatic rifle marksmanship in the prone position and fighting position, he needs practice in applying the fundamentals in alternate positions and at targets that will most likely replicate the battlefield.
b. Organization. The unit is assembled in the bleachers, given the training objectives, a range briefing, and a safety briefing. Automatic riflemen are then organized into firing orders with a firer and a coach. (It is necessary to have concurrent training stations set up for those soldiers not actually on the firing line).
c. Ammunition. This exercise requires 148 rounds of 5.56-mm linked ammunition (zero is included). The automatic rifleman is allotted two 3-round bursts per target.
d. Firing Sequence. The sequence of firing will be conducted IAW Firing Table IV (Table 6-2).
(2) Task 2, Engage single E-type silhouettes from the prone and fighting position, bipod supported (point targets) at various ranges. Targets are at 100, 200, 250, 300, and 400 meters. The automatic rifleman is allocated 30 rounds of ammunition.
(3) Task 3, Engage double E-type silhouettes (automatic weapon positions) at various ranges. Targets are at 250, 300, 400, 500, and 600 meters. The automatic rifleman is allocated 46 rounds of ammunition.
(4) Task 4, Engage linear E-type silhouettes (troops on line) at various ranges. Targets are at 300 and 600 meters. The automatic rifleman is allocated 60 rounds of ammunition.
Table 6-2. Firing Table IV.
(2) Puts his left foot well forward of the right. Leans forward at the waist toward the target with his knees bent, transferring his weight to his left foot before and during firing. This helps counter the recoil.
(3) Grasps the handguard firmly with his left hand. His left elbow is as nearly under the M249 as possible.
(4) With his right hand, places the butt of the M249 AR into the pocket of his right shoulder. Grasps the pistol grip firmly and pulls the weapon into his shoulder. Holds his right elbow horizontal to the ground or slightly above to form a good pocket in his shoulder. He does not use the shoulder rest.
(5) Lets his right arm absorb most of the weight of the weapon. Shifts his feet until he is aiming naturally at the target and obtains a good stockweld.
(6) Uses his left hand on the handguard to counter the tendency of the M249 AR to climb during burst fire.
(7) If there is not enough time to aim using the sights, applies quick-fire techniques. Looks through or just over the rear sight and uses the front sight post to aim at the target. Places the front sight post below the target (center base) and keeps his focus on the front sight post.
Figure 6-25. Shoulder firing position.
(2) Faces the target with his feet spread about shoulder width apart.
(3) Places his left foot in front of the right with most of his weight on his left foot.
(4) Bends both legs at the knees and leans forward at the waist.
(5) With his right hand, firmly grasps the pistol grip, and with his right forearm holds the stock firmly against the side of his body at a point between his armpit and waist.
(6) With his left hand, grasps the handguard firmly.
(7) Points his left foot in the direction of the target while his right foot provides stability.
(8) Depresses the muzzle of the M249 AR slightly so the strike of rounds can be observed. This reduces shooting high and takes advantage of ricochets.
(9) Leans toward the target before and during firing.
Figure 6-26. Underarm firing position.
(2) The arms are extended fully downward.
Figure 6-27. Hip firing position.
b. During the assault, the automatic rifleman must continue moving forward and reload as rapidly as possible. The sling allows the automatic rifleman to reload using both hands.
b. Organization. The unit is assembled in the bleachers, given instructions, and briefed on training that will be conducted while they are on the range. After the briefing, they are organized into firing orders and moved to firing lanes. Lanes are conducted and used IAW local range policies.
c. Ammunition. This exercise requires a total of 75 rounds of 5.56-mm linked ammunition. The automatic rifleman is allowed two 3-round bursts per exposure, and he is also required to conduct at least one rapid reload during the exercise. The commander has the option as to when the rapid reload may take place. Ammunition is configured into two belts of any size that requires the automatic rifleman to reload.
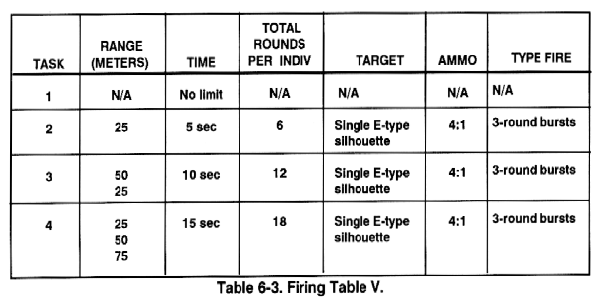
d. Firing Sequence. The sequence of firing is conducted IAW Firing Table V (Table 6-3). The suggested sequence of firing is as follows.
(2) Task 2, Engage single E-type silhouette from the hip firing position. After being issued the ammunition, the automatic rifleman begins his movement. When targets are exposed, he uses the hip firing technique. He will be given a single exposed target at a distance of 25 meters, with an exposure time of 5 seconds for each target.
(3) Task 3, Engage single E-type silhouettes from the underarm firing position. As the automatic rifleman continues to move through the course, he will then be given two single exposed E-type silhouettes at distances of 50 and 25 meters, where he will engage each silhouette using the underarm-firing position. The exposure time for these targets will be 5 seconds per target.
(4) Task 4, Engage single E-type silhouettes from the shoulder firing position. Once the automatic rifleman reaches the shoulder firing position, he will be given three single exposed E-type silhouettes at distances of 25, 50, and 75 meters. The exposure time for each target will be 5 seconds.
Table 6-3. Firing Table V.